Monday
- Welcome
- Getting to know each other
- Effective Study Materials
- Co-Creation (& input from online preparations)
- Tools for Co-Creation
- Teaser day 2
Tuesday (DAY 1 of the Design Sprint)
Define the Challenge
- Expert Interviews + HWMs
- Long-term (Co-creation) teaching objective + Sprint Questions
- Map
Produce Solutions
- Lightning Demos
- 3-Part Sketching
- Solution Sketch
Wednesday (DAY 2 of the Design Sprint)
Vote on Solutions
- Heat Map Vote
- Solution Presentation
- Straw Poll
- DeciderVote
The Storyboard
- Stakeholder Test Flow
- Storyboarding
Thursday (DAY 3 of the Design Sprint)
Draft
Friday (DAY 4 of the Design Sprint)
Stakeholder testing
Meervoudsvormen in het Engels krijgen nooit een ‘s. Dit wordt enkel voor de bezittelijke vorm gebruikt: bv Mary’s car. Mv HWM -> HWMs
Co-creation Using Open Source Methods and Tools
CoCOS - Method and Resources for F2F Co-Creation Training: Guidebook
CoCOS Method & Resources, March 2019
Ghent | Sofia | Velenje| Madrid |Burgh-Haamstede
Legal Disclaimer
The CoCOS project has been funded with support from the European Commission.
This publication reflects the views only of the authors, and the Commission cannot be held responsible for any use which may be made of the information contained therein.

License
CoCOS is encouraging the free access and use of education-related materials. This work is licensed under a Creative Commons Attribution-NonCommercial-ShareAlike 4.0 International License. (CC BY-NC-SA 4.0)

You are free to:
Share — copy and redistribute the material in any medium or format
Adapt — remix, transform, and build upon the material
Under the following terms:
Attribution — You must give appropriate credit, provide a link to the license, and indicate if changes were made. You may do so in any reasonable manner, but not in any way that suggests the licensor endorses you or your use.
NonCommercial — You may not use the material for commercial purposes.
ShareAlike — If you remix, transform, or build upon the material, you must distribute your contributions under the same license as the original.
No additional restrictions — You may not apply legal terms or technological measures that legally restrict others from doing anything the license permits.
Outline of the C1 training week schedule
Monday
- Welcome
- Getting to know each other
- Effective Study Materials
- Co-Creation (& input from online preparations)
- Tools for Co-Creation
- Teaser day 2
Tuesday (DAY 1 of the Design Sprint)
Define the Challenge
- Expert Interviews + HWMs
- Long-term (Co-creation) teaching objective + Sprint Questions
- Map
Produce Solutions
- Lightning Demos
- 3-Part Sketching
- Solution Sketch
Wednesday (DAY 2 of the Design Sprint)
Vote on Solutions
- Heat Map Vote
- Solution Presentation
- Straw Poll
- DeciderVote
The Storyboard
- Stakeholder Test Flow
- Storyboarding
Thursday (DAY 3 of the Design Sprint)
Draft
Friday (DAY 4 of the Design Sprint)
Stakeholder testing
This work explains the method we developed for co-creating course materials with students, teachers and professionals. Starting from the principles of 'design for learning' we adapted the 'Design Sprint' method for the purposes of this Eramus+-project and the face-2-face trainings we facilitated. The method is for guiding teacher teams in implementing co-creation aspects in their course didactiscs, not for co-creation itself. Via the design sprint, teachers move rapidly through both design and develop (prototypes) phases to ensure a good, co-created course.
The four chapters of this work cover: the outline for a 4-day training week, an introduction on learning design and design sprints, an extensive guide for facilitators of the CoCOS design sprint and a summary of all resources.
Organising a design sprint to develop co-created course materials benefits greatly from complementary skills, ranging from technical and pedagogical skills to communicative and graphic talents. It is, however, not always feasible to bring together a diverse team in which all elements of the T-PACK model (Technological, Content and Pedagogical Knowledge) are balanced out.
.png)
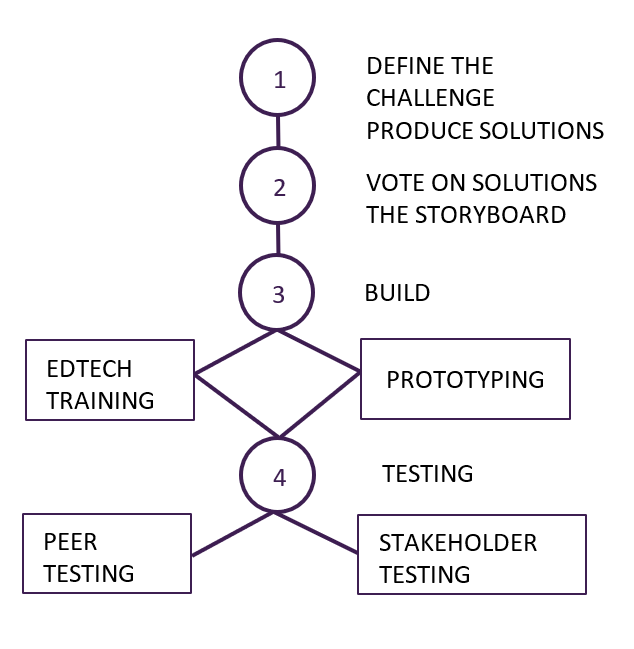
During the try-outs of the co-creation sprint method in local and international teacher teams, we often came across a lack of T: technological knowledge. To avoid this, the four-day design sprint can be adapted with edtech (educational technology) trainings and research instead of extensive prototyping. During these edtech trainings, teachers can explore and learn new technologies and directly develop the necessary components for their course. A list of edtech suitable for co-creating course materials is available on cocos.education and includes Hypothes.is, HackMD, Pressbooks and more.
A final adjustment to the sprint can be made on day 4 (TESTING) according to the time and resources available to the team. If there is no opportunity to involve actual stakeholders (students or people from the professional field), the team can opt for peer testing instead. Here a colleague or team member takes on the role of a stakeholder and provides feedback on the co-creation parts of the developed course.
The design sprint is originally a five-day process for answering critical business questions through design, prototyping and testing ideas with customers developed by Google Ventures (GV), a so-called 'venture capital arm' of Google's holding company 'Alphabet'. The original sprint was invented by GV members John Zeratsky and Jake Knapp and focuses on creating (mostly digital) products and services for the consumer market. The ideas and principles however, can be applied to broader sectors. Since teachers create or adapt their course materials year after year as part of a reflective educational design practice (Schön, 1987), the design sprint concept can be applied to higher education as well. Learning materials are constantly evolving products designed by teachers and HE staff, often combined with input provided by the professional field. Applying design thinking and design sprints to course development has been successfully accomplished by universities such as Coventry University (‘CU SPRINT – Flipped Toolkit’, n.d.) and University of Warwick (Toro-Troconis, J-M, H, D, & S, 2016) in the U.K. and eCampus Ontario in Canada (2019).
.png)
(‘The Design Sprint—GV’, n.d.)
By implementing the design sprint method, the three components of Learning Design (LD) according to the Larnaca declaration are covered: LD Conceptual Map, LD Framework and LD Practice (Konnerup, Ryberg, & Sørensen, 2018). The design sprint in an educational setting first focuses on narrowing down a general idea that transforms into a (conceptual) map or plan. The aim is to create a “pedagogically neutral” framework (Littlejohn, Jaldemark, Vrieling-Teunter, & Nijland, 2019) or design pattern that is applicable to multiple contexts, subjects, technologies and target groups (learners).
In order to better suit the co-creation aspects in course materials, the design sprint was enriched with and categorized by two dimensions: general didactics and course-specific applications. Empowering diverse collaborations with teacher groups is key during the first half of this sprint process. Whereas regular design sprints focus on people who work together in a company or institution, this version welcomes more diverse groups. It does so by targeting a rather general didactical design pattern (Laurillard, 2013) that is transferable to multiple courses or subjects.
The original design sprint was compressed to 4 days instead of the usual 5 dedicated sprint days. Reducing the amount of days and realigning the exercises in a design sprint 2.0 (AJ&Smart, n.d.) as provided by sprint company AJ&Smart together with the Sprint authors, results in a more accessible and approachable method for teaching and supporting staff.
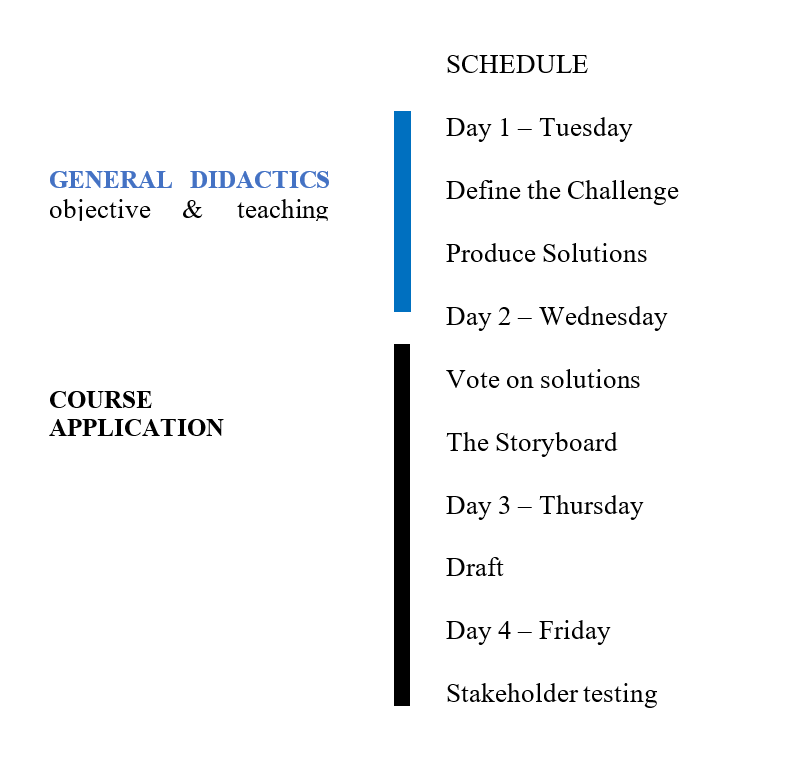
Day 1 and 2: through innovative exercises a common objective is defined and an appropriate co-creative teaching activity / strategy (method) is set up.. This outcome results in various teaching assignments or exercises that can be used in a formative or summative manner.
Day 3 and 4 allow each sprint participant to apply the meticulously planned teaching method to their own course or subject within the co-creation platform or other web-based tools required. At the end of the week all teachers have a firm first draft of their co-creation course materials and have gained valuable feedback that allows them to successfully refine and pilot their work by the students and stakeholders involved.
The training week organised in Ghent, February 2019, added an additional day prior to the design sprint to recapitulate the co-creation concept in the conceptual framework. An additional goal was added to ensure maximal gain from this international gathering. This way, the outcomes of the week can produce five different co-creation approaches / learning activities that will be used in the pilots. Per group at least one didactical co-creation method is developed, which can be transferred to other languages, countries and contexts.
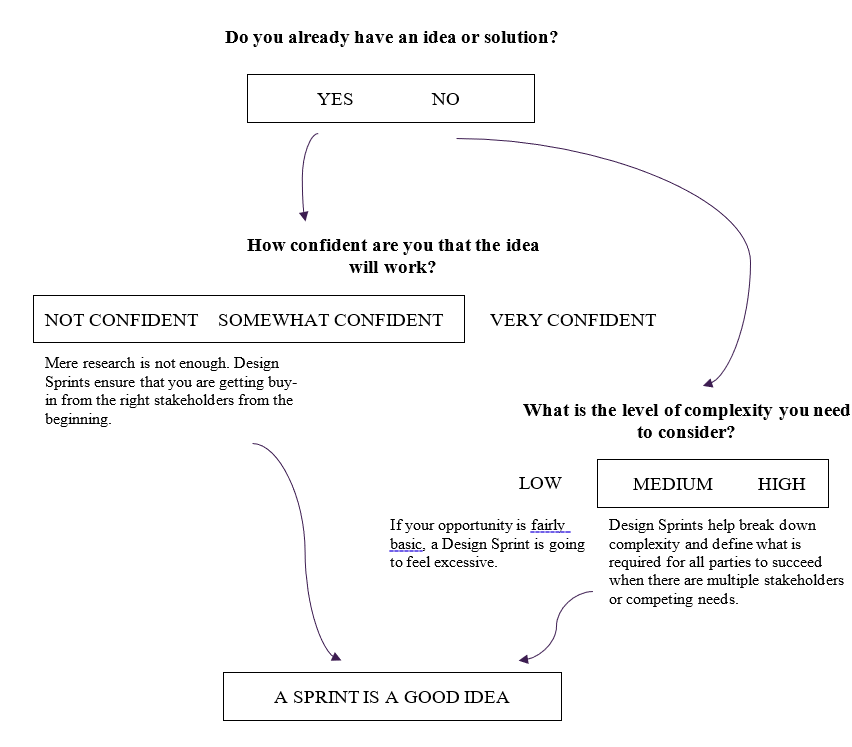
Design sprints are not always the best solution for developing course materials. If a group of teachers already has a good idea, a design sprint might be overkill. The decision tree below might help you decide if a design sprint is best for your co-creation need.
- large and small papers
- permanent & whiteboard markers
- post-it notes in different colours and sizes
- removable tape
- calming music
- green and red sticker dots
This document provides step-by-step instructions for those who facilitate a design sprint for co-creating course materials. Each day contains several activities, based on the works of John Zeratsky and Jake Knapp, creators of the original design sprint method. All activities described in this facilitator guide are accompanied by detailed instructions and real-life examples of the possible outputs. Activities are spread over four days:
Define the Challenge
- Expert Interviews + HWMs
- Long-Term Didactical Objective + Sprint Questions
- Map (45')
Produce Solutions
- Lightning demos
- 4-Part Sketching
- Note taking
- Doodling
- Concept
3.1.1 DEFINE THE CHALLENGE
3.1.1.1 Ask the Experts (Experts Interviews) + HMWs 20’ + 10’
After the introduction the first exercise of the design sprint 'Ask the Expert' (Knapp, Zeratsky, & Kowitz, 2016) takes off. The facilitator chooses a 'decider'. The decider ensures quick decision making and is crucial for moving the sprint forward. When discussions get stuck, he/she has the final say. The facilitator’s task, on the other hand, is to make sure everyone gets heard during the multiple phases of the design sprint.
As a facilitator, it is crucial to explain the funnel principle that underlies the first two days. Day 1 starts with a broad range of inputs and different viewing perspectives, making use of several brainstorming techniques, narrowing down towards a concrete co-creation plan on day 2.
The team sits in a conference room which includes a big table, a whiteboard and enough walls to hang post-it notes and sheets of paper. Each participant gets a stack of post-it notes and a pen. This first round should provide a broad view of the team’s vision on course materials. During the Experts Interviews the moderator asks questions to better understand the team, the team’s interpretation of the preceding online modules and makes sure all team members get on the same page from the start.
Each participant answers four questions, before going to the ‘expert’ (team member). The expert shares his/her opinion with the team in about one to three minutes.
Four questions that can start or spark the conversation:
- What is your course?
- What problem is your course trying to solve?
- Who is involved in your course and who would you like to involve?
- If everything went as it should, if there were no problems holding you back , what would your course look like in two years? What would be the ideal situation?[di1] [di2] [TC3] Think outside the box, there are no restrictions.
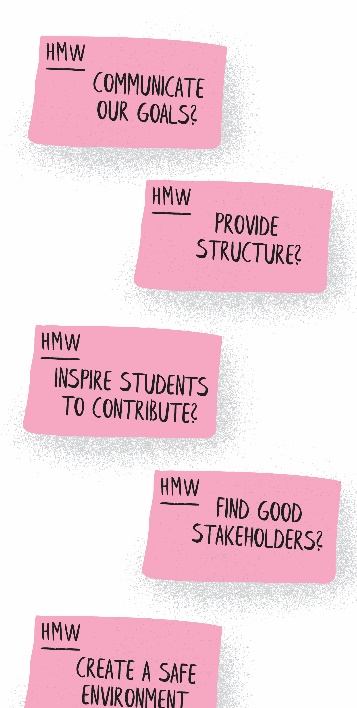
During the interviews everyone should note down things they hear and find interesting or challenging in the form of a question on their post-it notes so everyone can read them. Each question starts with the letters 'HMW' in the top left corner: ‘How might we ...?’
By using this strict format, even challenges are viewed from a more positive perspective. Participants should formulate HMWs that can apply to didactics in general even though the experts might give personal opinions and course specific examples.
The 20-minute timeframe of this exercise is important to force the team to keep focused and provide clear, short answers in the interview. An additional 10 minutes can always be provided if necessary.
Next, all the ‘How Might We…?’ notes are stuck onto a wall or window for everyone to read. Participants are given some time to quickly read the notes after which the moderator takes the lead. The facilitator guides the team in grouping the HMWs in categories using a blue marker. This categorisation process is solely for forcing the team members to read all HWMs and to get them in their heads. The most important part is just letting them read the HMWs.
Each team member gets two red dots, the decider gets four to decide the most important/interesting HMW questions related to developing co-created courses. A ten-minute voting session starts after which the moderator creates a 'voting tree'. Here, the post-it notes with the most votes are placed on top and the ones with the least votes below (like a tree or pyramid).
The HMW pyramid needs to be visible throughout the sprint and voted items mark their importance in the co-creation method. HMWs can always be reused and added to the following exercises. The post-it notes that were not chosen can be discarded, as well as the written categories.
EXAMPLE END OF ASK THE EXPERTS & HMWS
.png)
.png)
.png)
3.1.1.2 Long-Term Didactical Objective + Sprint Questions 5' + 5' + 7'
Long-Term (Didactical) Objective
What if we could look into the future? What would we see? How would our ideal co-creative course be designed / used? What would be the ultimate learning objective? Based on the input of the previous exercise, come up with your vision of the future for your didactics (not course specific).
The second exercise of the first day of the design sprint is about long-term goals and more specifically: long-term general didactical objectives. Every participant gets a number of post-it notes. Everyone writes down non-course specific answers (one answer per post-it) to the question 'In two years’ time, if everything worked out perfectly, what would the best-case scenario be? What didactical objective will be reached with the help of our co-created course?' The principles of effective study materials on effectivestudymaterials.com can help the team members if they struggle with these questions: structure, ESD (Embedded Support Device), diversity, language and spelling. These could be used as domains to focus on, but only if the team cannot come to concrete objectives.
.png)
This form of ‘engineering the learning process backwards’ resembles the didactical principle of stating the learning objectives before picking and elaborating on the best approach for learners to reach that objective. Similarly, the sprint pins down the co-creation learning objective first and picks and maps out the most suitable co-creation teaching activity in later steps.
Each post-it starts with 'In 2 years’ time ... ' and this exercise can take up to five minutes.
When time is up, the post-it-thoughts are stuck one by one on a wall by the facilitator while reading them out loud. Each participant then gets a single dot to vote for their favourite 'long-term objective’. Only the decider should wait and decide the final long-term objective afterwards with the help of a larger dot. He/she has the final say in choosing one general long-term learning objective that is applicable to the subjects of all teachers in the group (so not course specific).
EXAMPLE LONG-TERM (DIDACTICAL) OBJECTIVE
.png)
Other examples:
- ‘students and stakeholders contribute relevant content from their reference and experience to the course materials’,
- ‘students summarise course materials for their peers ‘(this can result in videos as the winning solution etc.),
- ‘students and professionals add example questions to the course that link the course content to the present situation in the (working) field’.
- broader objectives such as ‘in 2 years’ time I’ll have a course that is continuously up-to-date’ can be narrowed down in the map-phase of the sprint.
Sprint Questions
The second part of the long-term objective exercise demands a rather pessimistic viewpoint of the team. Together they look at the chosen long-term co-creation objective and think about what could stop them from reaching that particular goal. What could be a big challenge or concern and what would highly impact reaching this goal? Similarly to the previous part of the exercise, post-it notes now start with 'Can we ...'. Two to three sprint questions per team member should suffice. This all takes five to seven minutes after which a new voting session starts. This time the participants get three votes instead of one. Voting takes up maximum 7 minutes and then the decider picks the most important sprint question out of all post-it notes. Remove the sprint questions that were not chosen.
To conclude the exercise both the long-term objective and the sprint questions are written in the following format on a piece of paper or on a whiteboard: place the according post-its here as well.
GOAL: IN 2 YEARS’ TIME WE ...
QUESTIONS:
- Most voted question
- Voted question 2
- Voted Question 3
.png)
Make sure this is always visible during the entire design sprint. This way everyone can always look back at this.
EXAMPLE SPRINT QUESTIONS
.png)
Map 45’
Mapping the long-term didactical objective on an achievable time frame and with all necessary didactical requirements can sound a bit scary. The key of the map-phase in this design sprint is not to create a detailed, perfect timeline or stakeholder flow that takes hours or days to get right. Simplicity is king in this stage. So hold your horses: getting the details right will be addressed at the end of this day and during day 2. Within an hour, we can map a rough version of a teaching activity from start to finish (: reaching the objective). Eventually the voted HMWs (How-Might-Wes) can find their place on the map and the lunch break starts with a clear focal point in mind.
This is an example of what a map can look like if the design sprint was applied to a regular business instead of an academic course. The map represents the road towards the business' (in this case FOOD2YOU) long-term goal to get customers to return to their shop and make new orders. FOOD2YOU delivers food to your doorstep. In this map the customer is the soul actor that discovers the food delivery service via commercials or friends, visits the FOOD2YOU website or app and uses the provided steps to order food to, eventually, order some more. The map is not final and can be changed during any phase of the design sprint. It doesn’t contain any specific details or extensive brainwork either. Keep it simple and the exercise won't take longer than 45 minutes.
.png)
Analogously to the example above, the map represents all different steps taken by each actor (student, teacher, stakeholders in general) through the learning activity to get to the final objective. In order to apply the same mentality to the co-creation learning activity as to this business example, some crucial elements need to be added though. These questions relating to effective study materials need to be answered with keywords next to the map:
- What Embedded Support Device should we focus on the most to pursue the long-term objective? In other words: where will the co-creation take place? (Orienting, Assimilation or Testing)
- Do we aim for a formative or summative approach?
- If applicable: how much feedback / how many assessments will we embed? (The team can always come back to questions like these and change them.)
EXAMPLE ANSWERS ON GUIDING QUESTIONS
Example 1: objective = students provide a summary for each course chapter à co-creation takes place in / as an assimilation support device (side info: via the lightning demos the solution sketch can lead to a detailed exercise in which students create short videos TO VISUALISE the summaries of a certain amount of chapters
Example 2: objective = students and stakeholders provide up- to-date examples OF concepts in chapter xyz from their experiences and reference à orienting (and assimilation)
Start at the end by writing the long term objective / goal defined in the previous exercise to the right. Add the actors or stakeholders to the left. The next 45 minutes will be a guided spitballing-session and team members can shout what they believe to be crucial for the map. Start with 'instruction', the most evident part of the map. Then make your way through the rest of the map by filling the gaps for each of the actors. Not all input should be written down since changes can be made during the rest of the design sprint. It is up to the facilitator to select the words and write them in place. This is what the clean slate should look like:
.jpeg)
Starting with the path for one actor / stakeholder is easiest. Doing this for the most evident stakeholder can get the ball rolling for the rest of the map. For example:
.png)
Once one stakeholder is mapped out, the other gaps can be filled. In this example, the ‘colleague teacher’ and the ‘professional’ join a similar path to the student’s:
.png)
It would be too ambitious to work out the entire map in just a single design sprint. The next step is called 'Targeting the Map' and this will assure a clear focal point to demarcate the specifics of what needs to be addressed during the rest of the sprint.
Take the post-it-notes of the voted HWMs (How-We-Mights) and place them on the most corresponding place of the map. After this, the team has to choose a focal point on the map by adding a clear, coloured boundary encircling the words and HWMs chosen. Again, the decider has the final say about defining the scope of the focal point.
By selecting a specific target, it is more guaranteed to have a successful output at the end of the sprint. It is, however, very important to state that other parts of the map mustn’t be ignored. The target forms the most important element and the next steps of the design sprint should always take into account what happens before and after. For the CoCOS-training week the target must include the part(s) that will be drafted in the tool of choice.
EXAMPLE MAP
.png)
3.1.2 PRODUCE SOLUTIONS
3.1.2.1 Lightning demos 25’
Once everyone is on the same page and the focal point is narrowed down, time has come to open the view again. The lightning demos are a way of inspiring the team and pointing out that not everything needs to be reinvented from scratch. In a span of 25 minutes each individual conducts a very short research by browsing through the examples and testimonials on the online module, the web and/or their own experiences. Think outside the box.
Each team member collects inspiring or innovative examples that could be an example or method/learning activity for co-creating the course and, more specific, the target of this sprint. These examples can be products or services but may as well find its origin in personal experiences or initiatives he/she took in the past. Three big ideas per person should be the outcome when time is up and each participant makes short notes that help them explain each idea within a minute (no post-its needed).
The facilitator assigns one participant with the task of 'note-taker'. This person writes down keywords or, even better, draws small doodles of each lightning demo on a post-it-note. Each note contains the 'big idea', the key words or doodle that summarises the demo. When all team members have shared their stories, the big ideas are put on the wall as a visual inspirational mood board. The notes should stay on the wall so the examples can be revisited during the rest of the design sprint.
EXAMPLE LIGHTNING DEMO’S
.png)
EXAMPLE WALLS DURING 3-PART SKETCH
.png)
3.1.2.2 3-Part Sketching
During the final exercise of the first sprint-day it is important not to take sketching all too seriously. All participants must keep in mind it is ok to draw ugly and to use writing if that feels more comfortable. There is no drawing competition in this week.
3.1.2.2.1 Note taking 20'
A lot has happened during the first half day of the co-creation course design sprint. Now it is time to soak in the ideas and questions that stood out during the day. Each team member takes a notebook. Everyone walks around and copies lightning demos, the map, questions, long-term goals or HMWs they find interesting. To get started, each person starts with copying the long term goal and the questions. In this phase it is important not to think too much and not to search for solutions. The copying / note taking can span multiple pages. There is no framework or correct way of taking notes. Ask the participants to write down their own version of what is on the walls, so they can better understand and memorise them.
EXAMPLES NOTE-TAKING
.png)
.png)
3.1.2.2.2 Idea Sketching 20'
The second exercise of the three-part sketch should make the previous step more tangible. Ideas start to develop by quickly doodling parts of the notes from the previous step. Sketching helps connecting the dots and unconsciously gives you better insight in your own thoughts. This results in a very rough sketch of your entire solution for your learning activity ( the broad outline and main ideas).
EXAMPLES IDEA SKETCHING
.png)
3.1.2.2.3 Solution Sketch 30'
Alas, the final step has arrived! It is time to turn a full day of brainstorming and idea generating into a clear, general solution sketch. This non-course specific 'solution sketch' contains approximately four A4-papers taped together, as well as some smaller papers or post-its attached to it. The sprint questions, HMWs and more importantly the multiple steps in the map can be prepared and interpreted in numerous ways. By having each team member come up with his/her own solution of the map, the best practices will come to the surface. Although this heavy task might sound daunting, these four tips are here to help everyone not to take this last exercise too seriously (AJ&Smith):
- Ugly is ok
- Words are important
- Give it a nickname
- Focus on 1 idea
The only requirement is involving the co-creation platform (Open Webslides) in any useful way possible into the solution when sketching the course. Interactions with the platform can involve one or all of the stakeholders. The final result will be used the next day without the creator explaining the content. Every team member must make sure their solution drawing contains enough clear text.
The day ends with all solutions taped to the wall with the text and drawings facing away of any viewers. All concepts will be revealed the next day.
.png)
.png)
Vote on Solutions
- Heat Map Vote
- Solution Presentation
- Straw Poll
- Decider Vote
The Storyboard
- User Test Flow
- Storyboarding
3.2.1 Vote on Solutions
- Heat Map Vote 20'
The morning starts with an 'art museum'. All solutions for co-created courses have to be turned over and spaced out in the room for everyone to see. All team members get a sheet of little red dots.. These can be put on an entire solution or just a single aspect they find interesting and everyone should be extremely generous with their votes. The facilitator can encourage this behaviour by adding a large number of dots all over the art museum.
During the 20 minutes of this exercise no discussions or questions are allowed. That is why the second piece of the heat map provides a non-spoken solution: questions are written on post-it-notes and put below the concepts. Since no speech is allowed and concentration is important, calming background music might help with this exercise.
EXAMPLE HEAT MAP VOTE
.png)
2. Solution Presentation 20’
The presentation of the solutions or 'speed critique' requires the facilitator to explain every solution sketch that has more than approximately five red dots. One team member is assigned to summarise each solution by writing the big ideas on post-it notes and placing them above the sketches. The facilitator keeps track of time and avoids discussions by choosing which of the questions below the concepts will be answered .
3. Straw Poll 5'
Each group member gets a green dot and writes his/her initials on it. This is their final vote, the vote that marks what he/she would love to work on or to implement in a course. Now it is important to look back at the goals and questions from the day before and remind everyone their choice should also be based on those.
Each participant writes down why they chose this particular concept. This enables them to tell the others in one minute why they chose a certain solution. A quick round with each member explaining their choice ends this exercise.
4. Decider’s Vote 5'
The decider makes the final decision. He/she now gets two green dots with a star drawn on them. The decider has two options: put two dots on one concept or put one dot on a whole concept and one on a part of another concept.
3.2.2 The Storyboard
The next two steps bridge the gap between a general didactical approach and the course specific adaptation of the learning activity. Step 1 (Stakeholder Test Flow) divides the winning solution into defined, bite-sized steps that make applying them to each individual’s course or subject a lot more easy. The final course-specific storyboard will be a part of the stakeholder testing on day 5 because it shows the entire didactical co-creation approach of the course.
1. Stakeholder Test Flow
The hardest decision has been made and the team has gathered around (at least) one chosen solution sketch. This solution sketch should be translated into a clear storyboard in order to convert all of it into a course specific draft and a successful part of a definitive co-created course. It is, however, not easy to immediately transform these sheets of papers into a good and helpful storyboard. New ideas might occur or the alignment of the team could come under pressure during this phase. So how do all team members avoid drifting away from the winning solution, the set didactical objective and answers to the questions selected the day before?
First of all: time is precious. Allowing a maelstrom of iterations must be avoided during the actual ‘drawing’ of the storyboard. That is why all discussions happen in a structured method this design sprint calls ‘stakeholder test flow'.
Each team member writes five 'action steps' on post-it notes. Each action is the step a stakeholder takes in a specific part of co-creating course materials and, more specifically, during the part in the winning solution. Develop chronologic steps if the solution contains multiple stakeholders. Each post-it has a single step that leads to the next ‘scene’ in the storyboard, for example: 'the expert of the professional field creates his account on the LMS (learning management system) of the school and clicks on the correct course' or 'user reads email call to participate and clicks on the information link'. Team members can start with the first action step and then the last. After this they can fill in the remaining steps more easily. The map that was created the day before is a handy tool for writing the first step. The last step could be linked to the map as well and to the sprint questions made earlier.
Again, although most steps seem obvious, make sure the stakeholder test flow can lead to the best storyboard to explain the co-created course approach during the stakeholder testing. This exercise should also help each team member to translate the solution to their own course materials with the help of a clear format: the flow and the storyboard.
EXAMPLE ‘ACTION STEPS’ IN THE STAKEHOLDER TEST FLOW
- Student reads assignment and clicks on link to OWS (Open Webslides).
- Professional embeds recorded knowledge clip into the course text.
- Teacher adds most voted questions to the course materials.
- Students asks questions via annotations.
- Teacher revises submissions and grades via rubric in LMS.
All team members get about one minute to tell each of their steps while they put them on the wall. The action steps should be structured as seen below. Numbers are at the top and participant names are on the left. The number of rows can always be extended if the solution is more complex.
.png)
When everyone has spoken, the team has a clear vision on the steps a single (or more) stakeholder(s) take(s) during the prototype. Time to vote!
A single dot for each participant and two dots for the decider result in a chosen row of five steps. Voting only takes five minutes after which the team’s opinion is clear when it comes to this solution. Some team members might think differently about the process, others may agree on big parts of the actions steps. Each member votes the line that is perceived as the best user flow for the chosen solution. The decider votes last. S/he puts the first dot on the best user flow, either at his/her own discretion or influenced by the other dots. Then the second dot is put on a single action that must be brought in to the chosen flow.
.png)
The winning flow is circled by the moderator and the team has a clear view on all necessary steps for the prototype.
.jpeg)
In order to start drawing the storyboard, all steps should be placed in big rectangles on the wall. Each empty cell illustrates a single step.
2. Storyboarding
Storyboarding time! A storyboard is a crucial tool that allows you to make changes and smoothen the flow for the stakeholders to co-create the study materials. After one afternoon of storyboarding, the individual team members can fully focus on drafting their course or subject.
Each team member becomes a storyboard artist for the afternoon. He/she takes a large sheet of paper and draws the same number of large rectangles as in the previous exercise with enough white space below them to add notes or details. Now the general didactical co-creation solution is translated into a specific course. At the top of their page, team members write the course title, subject and / or chapter that will be used to implement the co-creation aspects.. Step by step, storyboard cell by storyboard cell, they will apply the general method to their own teaching practice. Each teacher is required to decide upon and add in many variables. For example:
- One teacher uses Moodle while another works with Canvas as the institution’s LMS;
- Actual course content must be chosen, the exact parts of the course that lend themselves to the co-creation learning activities;
- The target group might differ and require a different language;
- Deadlines must be decided based on the course, exam and institution calendars;
- One institution has a policy for using video content solely within a specific … while another uses YouTube instead;
- Criteria are refined based on learning outcomes and might use subject-specific rubrics for grading;
- …
This exercise concludes the funnel journey that started with extremely broad ideas and now ends in a customized and precise plan of action. At the end of the day all participants possess an extremely detailed, personalised and course-specific co-creation approach for their pilot course. Day 3 allows for drafting the course materials of that pilot course in the co-creation platform along with the required guides or info sheets.
3.3.1 Drafting (CoCOS Suite)
Since the extensive thinking process happened on day 1 and 2 of the sprint, the third day can be solely used for executing. The personalised storyboard provides all necessary info to create a first draft of each participant’s co-creation course. He/she starts with the storyboard cells that involve the co-creation platform (CoCOS Suite): adding the correct course materials / chapters, providing text structure markers and applying other aspects for effective study materials such as structure and appropriate language, open text areas, placeholders or other elements the winning solution requires. When all the materials are set up in the platform, the teachers can try the different CoCOS Suite functionalities needed in their co-creation learning activities. Other materials regarding the developed method can be drafted (guides, tutorials, assignment texts etc.) during this day as well.
3.4.1 Stakeholder testing
The last day of the sprint each course-specific co-creation method will be ‘tested’ by teachers of other teams. Within this international context, every teacher will gain valuable feedback by going through the storyboard and the course materials with the other sprint participants in the co-creation platform. The feedback is captured in a specific format that allows them to optimise their course if needed so they can start with a well-defined co-created pilot course when the training week is over.
New groups are created by assigning numbers to each member within a sprint team (from 1 to 5 or 6). Each number gets a (class)room to do the stakeholder testing.
3.4.2 Interview Reminders
Each new group has teachers with five different co-creation approaches for their course. One teacher at a time goes through the storyboard and the parts in the co-creation platform, explaining their course-specific adaptation of their team’s winning solution. The teacher who is ‘presenting’ can ask questions to the rest of the group to gain feedback for the different steps of the didactical method they present.
When asking for feedback during the ‘interview’ / presentation, keep these tips in mind (based on questions developed by AJ&Smart):
- Ask open-ended questions
- DON’T ask multiple-choice questions
- DON’T ask yes/no questions
- Ask broken questions (to start asking a question but let your speech trail off before you say anything that could bias or influence the answer)
- So what… is…
- Bring your curiosity
- DON’T assume. Ask why!
The teacher writes down any feedback involving tweaks that need to be made to the co-creation course, on a red post-it note. Positive feedback is written on green post-it notes and all inputs are gathered on a sheet of paper.
3.4.3 Debriefing (5 min)
Each teacher ends the interview with a debriefing. These example questions can help to summarise the feedback (based on questions by Google Ventures):
- Which aspect of the method surprised you?
- How would you describe the method to a colleague?
- Who do you imagine would use the method?
- How does it compare to courses or classes you have seen in the past?
- What are the pros and cons of this experience? If you had a magic wand and could add, remove, or tweak anything about what you saw, what would it be?
- How would you feel about using this course in the future?
Answers to these questions are assembled on post-it notes and on the sheet of paper, combining both points for improvement and positive feedback per co-creation method.
When all interviews are over, each teacher has a clear view on what works and what needs to be changed to have a good co-creation integration of the course. This is the beginning of a good co-created course pilot. Remember that design sprints do not have to be final and can be revisited or held again anytime to further improve the co-creation of course materials in any subject imaginable.
- C1 Scenario
- Presentations
- Day 1
- Day 2
- Day 3
- Day 4
- Day 5
- Quicksheet with recap conceptual framework
- Quicksheet Effective Study Materials
- Checklist criteria for successful co-created courses
- Quicksheet Design Sprint i.f.o. creation of co-created courses / study materials
- A more detailed step-by-step guideline for design sprint with respect to co-created study materials
- Templates for the design sprint method
AJ&Smart. (n.d.). DESIGN SPRINT 2.0 PROCESS EXPLAINED 2018. Retrieved from https://www.youtube.com/watch?v=Z8MOwcqZuuU&list=PLxk9zj3EDi0X5CgoFckoheIFAx-uT2i7j
CU SPRINT – Flipped Toolkit. (n.d.). Retrieved 5 June 2019, from https://flipped.coventry.ac.uk/sprint/
Knapp, J., Zeratsky, J., & Kowitz, B. (2016). Sprint: How to solve big problems and test new ideas in just five days. Simon and Schuster.
Konnerup, U., Ryberg, T., & Sørensen, M. (2018). The teacher as designer? What is the role of ‘learning design’ in networked learning?
Laurillard, D. (2013). Teaching as a design science: Building pedagogical patterns for learning and technology. Routledge.
Littlejohn, A., Jaldemark, J., Vrieling-Teunter, E., & Nijland, F. (Eds.). (2019). Networked Professional Learning: Emerging and Equitable Discourses for Professional Development. Retrieved from https://www.springer.com/gp/book/9783030180294
Schön, D. A. (1987). Educating the reflective practitioner.
The Design Sprint—GV. (n.d.). Retrieved 5 June 2019, from http://www.gv.com/sprint
Toro-Troconis, M., J-M, Bridson, H, Halawa, D, Prescott, & S, Edwards. (2016). Course Design Sprint Framework (CoDesignS).